Monday, May 17, 2010
Project: 1/48 Marder IIIM
The Marder series of armored vehicles were a German effort to self-propel their anti-tank artillery. The very first vehicle in the series, the Marder I, mounted a Czech 47mm anti-tank gun on a Panzer I chassis, and would set the stage for the shape these vehicles would take. The Marder II series mounted the captured 76.2mm (rebored for 75mm) Soviet field gun, while the Marder III series mounted the reliable 75mm PAK 40 anti-tank gun. A variety of chassis were used for both the Marder II and III, but mostly consisting of the Panzer II and the Panzer 38(t). The "M" variant was the final form these vehicles would take, with the engine mounted in the middle of the vehicle, and the fighting compartment moved to the rear. This allowed for a much larger fighting compartment and thus better "fightability."
Tamiya's model depicts the Marder IIIM, the final type of this vehicle series. Overall the kit moldings are nothing short of spectacular, with a great amount of detail. More importantly, however, is the hull. Gone are the clunky cast metal hull tubs, and instead this area is depicted in multi-part plastic instead, with a commensurate increase in detail. There are metal weights supplied to give the model "heft," but in my opinion this feature is absolutely useless and adds nothing to the kit (an artifact of the "collectibles" market were "heft" is perceived as having better quality, despite the fact this has no basis in reality).
Also of note is the very nice PAK 40 75mm L/46. This also has loads of detail, and would make a nice basis for towed PAK 40 (which would only need a carriage -- hint to Tamiya). Finally, the kit includes a single figure, which like many Tamiya figures is a bit on the small side. I will most likely assemble it, but depending on final measurements I may or may not actually use it.
Saturday, May 8, 2010
Project: M-8 Greyhound Armored Car Progress I
Like any OOB (Out Of the Box) build, construction is fast, especially in 1/48 scale. The entire build time took perhaps 3 hours spread over the course of a few evenings. One of the techniques I have been using is building in "micro-sessions" of perhaps 15min or so spread out over an entire night. I found that when I had longer sessions, I spent an inordinate amount of time staring at the directions or waiting for things to dry. But spending only 15 minutes or so building meant that there was less wasted time.
Here essentially construction is complete. The only details that must be added are the wheels (left off for painting) and the fenders (for the same reason. This vehicle will get a primer coat of Testors Enamel in a spray can, before airbrushing with Polly Scale Olive Drab (my preferred brand for this color).
Although the kit comes with a figure, it looks like it falls short like many Tamiya kit figures in this scale, literally. Many Tamiya figures scale in at around 5'4", making them a little short. While soldiers of this size were not unknown in WWII, it would have been nice to get a figure with a little more height. What I may do is pose him standing in the vehicle while looking off in the distance with his binoculars. This should make his height deficiency less apparent. I'll have to come up with a gunner from somewhere, perhaps aftermarket.
Wednesday, May 5, 2010
Project: 1/48 M8 Greyhound Armored Car
The M8 Armored Car was the standard of its type used by the US Army during WWII. Developed from a family of different armored car designs, the US Army selected the 6-wheeled vehicle as the best compromise between mobility, weight, and protection. Although there were larger armored cars (with armor approaching that of a medium tank), for the selected role of reconnaisance and cavalry duties, the vehicle was potent enough for the job.
The M8 mounts a 37mm anti-tank cannon, the same as fitted to the M3/M5 Stuart family, and could fire AP, HE, and Cannister rounds. Backing this up was a .30 (7.62mm) M1919 machine gun, and a .50 (12.7mm) M2HB machine gun. Early models had the heavy machine gun mounted on a simple pintle mount at the back of the turret, but later designs replaced this with a ring mount for improved 360o coverage.
Like the SU-122, this kit is another OOB (Out Of the Box) build, and there is not much needed to improve it on the outside. That being said, the interior is very sparse, with only the turret floor and crew seats in the turret (thus lacking things like the ready-rack for the 37mm cannon), and having absolutely no detail in the driver's compartment. This is less of an issue with a vehicle like this, since not much of the interior can be seen anyway, but the turret details are sparse enough as it is, and could have used a few more details in this area.
Monday, May 3, 2010
Project: 1/48 SU-122 Progress I
As I had mentioned in the last installment of this project blog, I intend to build this kit mostly OOB. This consequently means a fast build, so here is the progress so far.
Construction on this kit is essentially done. There were no real hang-ups in the construction process, and it (like most Tamiya kits) went together almost flawlessly. Especially nice were the auxiliary fuel tanks on the hull rear, which had the seams cunningly hidden via the construction process. It still pays to clean up the seams, but this method goes a long way to improving the look of the kit.
Also of note is that the kit possesses adjustable idler mounts. This means that the modeler can adjust track tension to make sure the tracks fit perfectly. While this is a good idea, I still managed to have a gap in the tracks (though I hid it for the most part under a fender). If I adjust the idler back anymore, it will rub against the first road wheel (these tanks had rear-mounted transmissions, and thus were rear wheel drive). In the future, it might be better to simply add a link to the tracks (the kit gives you a few spares) and see how that works.
The kit in the photo has been primed using Testors Enamel Light Gull Gray in the spray can. This will provide a nice, neutral base for further coats of paint. Also because it is an enamel (and using an organic solvent it is slightly "hot," producing a better chemical bond to the plastic) it will better hold the paint for follow-up coats. Also the tracks as can be seen are constructed to be removed, and have been primed black, to give it a good foundation for producing a steel metallic color.
Wednesday, April 21, 2010
Project: Grenadier Dragon Lords Red Dragon Progress I
Here is the old girl fully assembled with its first coat of primer.
One of the interesting points about this project was the construction sequence. As can be seen in the photo, this dragon has very large wings. And, being molded in lead alloy, they are also consequently heavy. Therefore, it took quite a bit more work to assemble this model than I had initially expected.
As usual I used 5-minute epoxy during the assembly process. Unfortunately, I did not have anything appropriate to prop up the wings while the epoxy cured, so I physically had to sit and hold the wings together while the epoxy cured. I had attempted to time the process, so I wouldn't have to hold them together for the whole 5 minutes, but even after the epoxy's "working time" expired, I had to continue to hold the wings for an extended period of time until the epoxy cured enough on its own. After that, the rest of the assembly process was trivial.
The figure was mounted on a plastic 50mm round base sourced from EM-4. They come in a bag of 5 for £1.50, not bad in this era of eCommerce and cheap shipping from the UK Royal Post. This base roughly coincides with a Large-sized Red Dragon by D&D 3/3.5/Pathfinder rules.
Next up will be the first basecoat. Thanks to the white primer, a coat of Citadel's Blood Red should produce a brilliant red color.
Tuesday, April 20, 2010
Project: 1/48 SU-122
The SU-122 was designed in response to the use of self-propelled assault guns by the German Army in WWII. Vehicles like the StuG III were designed to provide direct-fire artillery support to infantry troops on the battlefield, and be able to resist anti-tank weapons of the time. Based on the proven T-34 chassis the SU-122 (designation refers to the caliber of cannon used, in this case a 122mm howitzer) was more powerful than its German counterparts, able to throw a much larger shell.
Tamiya has followed up on their T-34 kit with this SU-122, and it's definitely a nice model. After working on a number of complex builds using after-market parts. I intend for this to be an "Out of the Box" build: simple and not encumbered by large numbers of after-market parts (in fact, I'll be building the model unmodified, with perhaps a bit of stowage). Expect some updates soon.
Saturday, April 17, 2010
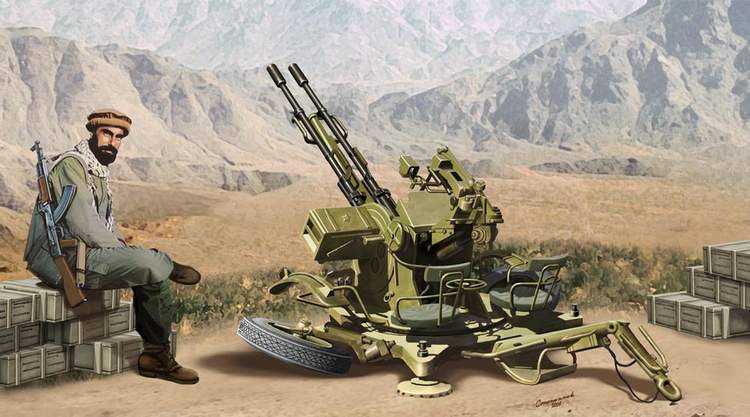
Project: 1/48 ACE ZU-23-2
One of the results of the thawing of the Cold War and liberalization of the economies of Eastern Europe is it allowed a lot of entrepreneurial-ism, which has been nothing but good for model builders. Hailing out of Kiev, Ukraine, ACE models has for several years concentrated on manufacturing small scale (1/72) armor kits and the like. Using limited run plastic injection molding technology, the ACE kits were always for more experienced modelers, and a little on the rough side. That being said, they also manufactured kits not produced anywhere else before or since, mainly concentrating on Eastern European designs, with a smattering of western designs as well.
The ZU-23-2 (kit # 48101) is ACE's first foray into the world of 1/48 scale modeling. I have to say, its a pretty nice kit, and much better than my memories of their older 1/72 scale kits.
The ZU-23-2 was one of the standard Soviet light anti-aircraft cannons, and is still in use today with a number of operators. Firing a 23mm shell, it is designed to be a more potent successor to the ZPU system (which mounted 14.5mm machine guns). Although lacking many of the modern aiming aids such as radar direction, it is simple, easy to use, and useful against both aerial targets (especially helicopters) and ground targets.
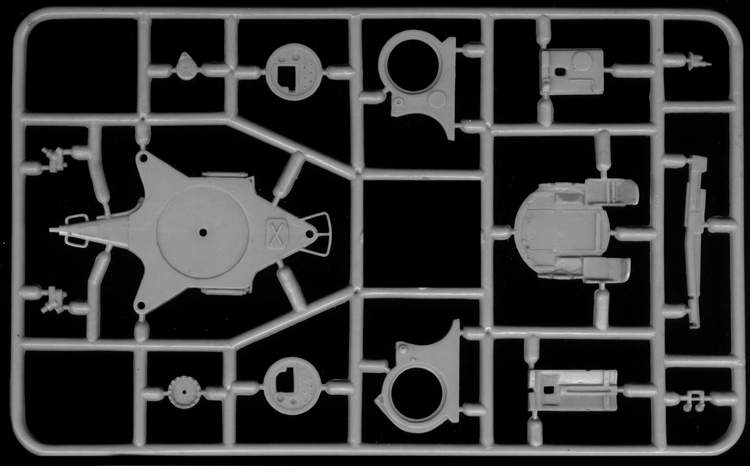
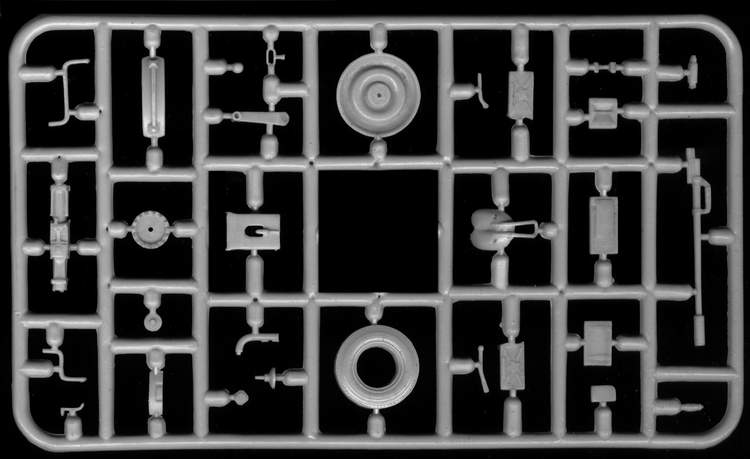
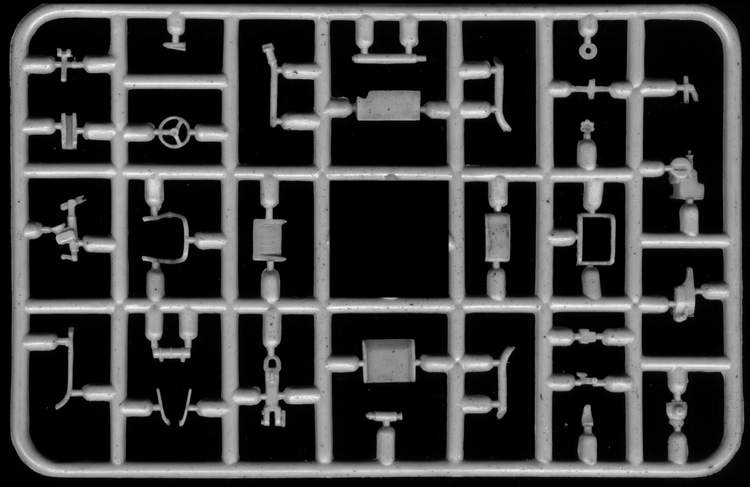
As can be seen from the sprue shots (these are taken from ACE's website, by the way), the kit includes 4 sprues, with 2 identical. The quality of the moldings are very good, and while some of the parts still have thick gates to be removed, the quality and finesse of the parts are better than older kits.
I have to admit, one of the reasons I bought this kit was to encourage ACE to do more in this scale. With a grand total of 2 different model kits of modern molding quality currently in plastic (unless you include the old Tamiya/Academy/Arii battery powered carpet crawlers, or the equally dreadful and not especially accurate Kitech/Zhengdefu kits), there's not a lot that can go with this kit, unless you resort to resin. But still, it's a very nice kit, and looks like it will be a fun project.
The ZU-23-2 (kit # 48101) is ACE's first foray into the world of 1/48 scale modeling. I have to say, its a pretty nice kit, and much better than my memories of their older 1/72 scale kits.
The ZU-23-2 was one of the standard Soviet light anti-aircraft cannons, and is still in use today with a number of operators. Firing a 23mm shell, it is designed to be a more potent successor to the ZPU system (which mounted 14.5mm machine guns). Although lacking many of the modern aiming aids such as radar direction, it is simple, easy to use, and useful against both aerial targets (especially helicopters) and ground targets.
As can be seen from the sprue shots (these are taken from ACE's website, by the way), the kit includes 4 sprues, with 2 identical. The quality of the moldings are very good, and while some of the parts still have thick gates to be removed, the quality and finesse of the parts are better than older kits.
I have to admit, one of the reasons I bought this kit was to encourage ACE to do more in this scale. With a grand total of 2 different model kits of modern molding quality currently in plastic (unless you include the old Tamiya/Academy/Arii battery powered carpet crawlers, or the equally dreadful and not especially accurate Kitech/Zhengdefu kits), there's not a lot that can go with this kit, unless you resort to resin. But still, it's a very nice kit, and looks like it will be a fun project.
Subscribe to:
Posts (Atom)